Tuesday, January 11, 2011

Italian Chicken Salad Lettuce Cups


These were the perfect bite for healthy eating after the holidays.  I absolutely love the beautifully big leaves of butter lettuce.  This dish has inspired me to figure out what else I can nestle into these leaves....  We served these as an appetizer before dinner one night and they were a huge hit.  Easy to pick up, and healthy too.  Needless to say, I took them to work over the next few days for lunch (I assemble at work though, not beforehand.  Otherwise the lettuce leaves would get soggy).  What's in them?  Shredded chicken - and yes, I went with rotisserie chicken for convenience.  It's already cooked perfectly so that shredding is a piece of cake!  The chicken gets tossed with red onions, which I sliced on a mandoline so they were paper thin in the hopes that none of my guests would bite down on an overwhelmingly large piece of onion.   Roasted red peppers, parsley, and parmesan were also finely chopped/shredded and thrown in the mix.  The dressing for the filling was what really drew me to these - when I think of chicken salad, the first thing I think of is..... mayo.  No thank you.  Mayo does nothing to help me out in holiday recovery :)  My sister-in-law must have been thinking along the same lines when she shared this recipe with me....This dressing is a lot lighter: red wine vinegar, fresh lemon juice, olive oil, honey, s&p.  Nice, right?  Of course, I used my mini-cuisinart so the dressing was perfectly blended.  

Make them again? I am interested in making lettuce cups of all sorts now :)  Especially because these were butter lettuce leaves, which are way better than romaine or iceberg lettuce due to the fact that the leaves are way more flexible when you fold them around your food.

Improvements:  Yes, this recipe will need some tweaking for my tastes.  It came from Giada, who chose to also put in almonds and capers, which I omitted.  Capers = no thank you.  Almonds - I just didn't have any on hand.  Next time maybe.  But I also felt that the dressing was too much for the ingredients - it seemed too 'wet' in my opinion.  I'd use less dressing in the future and also throw in more vegetables for crunch and texture.  Maybe cucumber or celery or fresh bell pepper.

Here's the recipe:  
http://www.foodnetwork.com/recipes/giada-de-laurentiis/italian-chicken-salad-in-lettuce-cups-recipe/index.html  
Thanks Giada!

Saturday, January 8, 2011

Artichoke Gratinata

Artichoke hearts are a thing of beauty to me.  They are so incredibly delicious and hidden so well amidst all those protective layers; it is the closest we may come to finding that pot of gold at the end of a rainbow.  However, I love them so much that sometimes I don't want just one (heart, that is).  So last night I opted for an entire batch of them.  This recipe makes for a beautiful side dish - and it is rather painless.  I find them to be so satisfying though, that I was content to pair them with a green salad (topped with the ultimate vinaigrette of course!) and call that dinner.  I prefer frozen vegetables over canned ones, so I warmed these little hearts up in my saute pan along with garlic, salt, pepper and red pepper flakes.  After they browned slightly, I simmered them in chicken broth and a bit of Marsala wine.  This is when my kitchen began to smell amazing!  Not being that experienced in cooking with Marsala - after this dish, I will now look into it more.  The Marsala wine straight from the bottle makes me feel as if I am sipping Sunday communion.  But in cooking, it's pretty outstanding as a flavor agent. The recipe called for a topping: bread crumbs (I like using Panko), a bit of butter, and parmesan.  These are all delicious eats by my standards so I knew as I sprinkled this trio atop the gorgeous hearts that smelled so good that I was in for quite a treat.  The whole pan went straight into the oven for about 10 minutes to crisp and brown the topping and that's it.  There were no leftovers to speak of :)  Thanks Giada.

Make it again:  In my opinion, artichoke hearts far outshine peas and carrots as a starlet veggie you can serve to guests you have over.  This recipe will go into my rotation of items to serve to guests, no doubt.  And at the same time, I plan on enjoying them when it's just the two of us as well!

Improvements:  None to speak of at this point.  These were beauties all on their own.

Here's the recipe for you to try:
http://www.foodnetwork.com/recipes/giada-de-laurentiis/artichoke-gratinata-recipe/index.html

Tuesday, January 4, 2011

The Ultimate Vinaigrette


With the holidays behind us and a fresh new year ahead, it's time to starting eating more salads.  And pretty much less of everything else:)  As much as I enjoy holiday eats and treats, I grow weary as December ends and my pants no longer fit.  I feel programmed to increase my healthy factor as soon as January 1 hits.  Now, as much as I love salad, and I really adore salad, I often struggle to find salad dressing that both tastes delicious and isn't too hard on my waistline.  My husband and I sample countless bottles from various stores and restaurants, but rarely do I find one that lasts.  I am beginning to think homemade dressing is the way to go.  The only thing that really prevents me is my own laziness - yes, at times I would rather unscrew the cap to some random bottle of dressing.  But after this recipe, I am dedicating my efforts to homemade!  Just the other day I received this, the Ultimate Vinaigrette, from my sister-in-law.  You have probably figured out by now that with the word 'ultimate' in the title that this creation belongs to none other than Tyler Florence.  Once I saw that, I was sold :)  I love Tyler Florence, he's such a cutie!  And both his shows and his recipes are truly fantastic.  This particular dressing went with a very simple salad of just arugula.  Personally, I sometimes envision vast fields of clover when eating arugula because of its taste.  The dressing has to be really good, otherwise I feel like I'm grazing.  This one did the trick - it was outstanding!  I added butter lettuce and radicchio for color and texture.  But that was it, nothing else needed.  This dressing stood on its own and was a fantastic complement to the variety of lettuces.  Oh yes, I did use one other thing......

This mini.  In went, whole shallots, dijon mustard, red wine vinegar, olive oil, salt, pepper, sugar and honey.  Fits right in with New Year's resolutions, right? The dressing was done in less that 5 minutes.  This mini has come in handy so many times that it has earned a permanent spot on our kitchen countertop.  Homemade dressing is now more attainable to me.  Also, I really prefer how incredibly well the olive oil gets blended with the rest of the ingredients due this mini's high speeds.  It leaves my whisking-by-hand in the dust.  Besides, I always detested the fact that I would whisk together a dressing and before I even poured it over the salad the oil separated from the vinegar.  A sincere thank you to my sister-in-law for finding this gem :)

Make it again? No question, we're having it tomorrow night!

Improvements?  Not a thing.  Unless you're in the mood for a little heat, then throw in some red pepper flakes or a dash of cayenne pepper. I also believe it would work with any lettuce, spinach or other vegetables you'd like to throw in.

http://www.foodnetwork.com/recipes/tyler-florence/arugula-salad-and-ultimate-vinaigrette-recipe/index.html


Saturday, January 1, 2011

Roasted Vegetable Tarte Tatin


Happy New Year!  I thought I'd start off 2011 by sharing an absolutely delicious creation.  To my surprise, the Food Network Magazine consistently delivers solid recipes that rarely fail to please.  This was my favorite from all of my holiday cooking.  I had never heard of a Tarte Tatin, but in doing a little research I learned that it was created in error as two French sisters attempted an apple pie gone wrong.  What you're looking at above are gorgeous roasted root vegetables: sweet potatoes, fingerling potatoes, parsnips, leeks and garlic all slow-roasted first to bring out their flavor.  As they cooked, I created a little caramel and then proceeded to assemble this dish upside-down.  The caramel went down first, followed by sage and oregano.  As the root veggies came out of the oven I positioned them in the caramel which hardened very quickly.  I was afraid at this point because the caramel wasn't perfectly covering the bottom of my baking dish - thankfully this all smooths out when you put it back into the oven.  A small sprinkling of mozzarella cheese and a final layer of puff pastry were the final toppings.  It baked for only a short time before smelling divine.  Once it came out I had to invert it.  This was the scary part - the pan had to cool for a bit but remain relatively warm for the Tarte Tatin to pop out.  I held my breath as both myself and my mom (assisting me as sous chef for this dish) had four hands working to flip it.  To my great surprise, it worked!  The picture you see is only moments after it came out of the pan.  We sliced it up immediately and it was pure heaven!  The sweetness of the caramel sauce pairs amazingly with these root vegetables.  A total winter treat in my opinion :) 

Make it again? This is sure to impress any dinner party.  In fact, it is pretty enough to place as your centerpiece.  Serve it right on your cutting board covered in parchment paper and scatter it with a few more herbs for a rustic, beautiful focal point.  I plan to use it for dinner parties and holiday gathering throughout the winter months.

Improvements?  No improvements to this recipe are needed.  It is perfect.  Variations could be fun though.  Different herb combinations as well as alternate root vegetables could be used.  I used leeks because I had them on hand even though the recipe called for a regular onion.  Purple potatoes would also add to the presentation.   

Here is the link for the recipe, enjoy!

http://www.foodnetwork.com/recipes/food-network-kitchens/vegetable-tarte-tatin-recipe/index.html


Friday, November 19, 2010

Sweet Potato Chips


Sweet potatoes, I'll take 'em any way, shape or form.  By far, one of my favorite fall veggies.  I'm always searching for different ways to prepare them.  Combine that with the fact that my mom bestowed upon me her mandoline and this is what you get: chips :)  These chips were super easy to prepare.  My least favorite part of sweet pots is when I have to peel them - but no peeling here.  Just a thorough scrub, a pat dry, and onto the mandoline.  I had about six sweet potatoes and once I put them through the mandoline, they made a LOT of chips.  I actually had to bake them in batches because there were so many of them.  Seasoning was simple: olive oil, sea salt, and cinnamon.  That's it.  I made the very first round with pepper, but found that I didn't like the pairing of the cinnamon with the pepper.  Also, the chips have to lay flat and be spaced apart from one another on the baking sheets, otherwise they won't come out 'chip-like.'  Into the oven at 350 degrees for a brief 15 minutes.  (And trust me on that timing, I thought batch number two needed a few extra minutes and I ended up with undefined, black disks!).  When they were done, I simply piled them onto a plate in huge heaps, easily accessible for snacking as we went about our evening.  The best part was that my husband kept walking by the table swiping a chip or two, commenting on their sweetness.  He didn't believe me that there was no sugar added....

Make them again?  Yes.  Absolutely.  In fact, I am now interested to know what other types of vegetables I can 'chip.'

Improvements?  Well, in this first round I certainly learned on the job.  I tossed the sweet potato chips lightly in olive oil at first.  But found them to be oil-laden and heavy when they came out of the oven - they were not light and crisp.  So the second time around I switched to a spray olive oil instead.  This allowed me to achieve the chip consistency I was hoping for.  Besides the oil factor, I know are more spice combinations to be had with these sweet little pots, and that is what I plan on trying next. 

Monday, November 15, 2010

Hearty, Fall Chili. Round One.


The weather has cooled enough for chili.  I am so excited - it is finally time to cozy up with hearty bowls of homemade deliciousness, just they way we like it.  I prefer to make my own chili from scratch (versus 'from the can') because I am not always a fan of all the ingredients or seasonings included.  I like to choose my own meats, veggies, beans and spices; and blend them in proportions to my liking.  This November Chili is Round One - the chili at our house is like snowflakes, we never make the same batch twice.  For a lead-off batter, this one scored.  

Meat selection was a pound of each - bison and turkey sausage.  I have heard more and more about bison lately, especially how lean it is.  A little nervous about a new meat - I picked up a pound from Whole Foods, pleasantly eyeing the '90% lean' signage it displayed.  When I got it home and put in the pot to brown up, I found the aroma very mild and light.  I browned the sausage simultaneously - two meats offer more flavor than just one, right?  The meats got the first blast of seasonings: chili powder, cumin, red pepper flakes, s&p, all to taste.  Then out came the meats and in went the veggies - two yellow onions minced, four cloves of garlic, a large bunch of spinach cut into thin ribbons, and an equally large bunch of kale, also in ribbons.  At this point, I took a slight tangent.  After adding the meat back in to the nicely sauteed veggies, I chose to deglaze the pan with one beer (brand is your choosing).  The beer reduced for about 4-5 minutes and later on this concentrated flavor really added a distinct note to the dish.  Back on track, in went one can of roasted tomatoes, one cup of stock, and one can of pinto beans.  As the chili started to boil, the broth was sampled and seasoned accordingly, with more of the spices mentioned previously.  The only new addition was the tiniest dash of cinnamon, which I find adds a warm to meaty dishes that is undeniably delicious.   From here on out, this pot of goodness simmered until the ingredients were married into wedded bliss (about a good hour).  And we always make sure to serve it up with classic condiments: avocado chunks, light sour cream and shredded cheddar. 

Make it again?  Yes, of course.  Same players, perhaps a slight variation.  But we certainly achieved hearty satisfaction with this one. 

Improvements? Well, I wouldn't be able to call anything added next time an improvement until we taste it.  This chili was damn good.  Potentials currently are - a different combination of meats, more beans, and definitely more greens.  I loved the green element because they easily assimilated into a dish that typically does not feature veggies.  I can't wait to up the ante next time.

Saturday, November 6, 2010

Pumpkin Pie Bars


I wanted to honor my friend's fall birthday with some baked goods.  Brownies didn't seem to say 'October' to me, nor did chocolate chip cookies.  So I went in search of a treat featuring one of my fall favorites: pumpkin.  Keeping in mind that it was too early for Thanksgiving's pumpkin pie, my quest led me to the Brown Eyed Baker.   I stumbled across her blog while searching for pumpkin desserts and was pleasantly surprised.  I liked the things she'd been baking.  And I found exactly what I was looking for: Pumpkin Pie Bars.  She described them as pumpkin pie 'without the crust' but I found them to be much firmer than the pie filling.  They did have a certain reminiscence of pumpkin pie; the pumpkin kept these bars very moist.  I dusted the top with sugar and delivered them to my friend with a birthday candle on top.  (Because at our age, we don't need anything more than a solitary candle).  The verdict: she loved them!

Make them again: Yes, but I would like to alter the consistency ever so slightly.  

Improvements: They were quite dense.  I need to figure out which ingredients to change to make them lighter and a bit fluffier.  

Follow this link for the recipe: http://www.browneyedbaker.com/2010/10/14/pumpkin-pie-bars/


Sunday, October 31, 2010

Roasted Pumpkin Seeds


Pure awesomeness based on points in both the taste and nostalgia categories.  And we roasted these seeds authentically - straight from the pumpkins as we were carving them.  I swear that made them taste even more delicious.  A dash of olive oil, a sprinkle of salt (no pepper), and that was it!!  I can't even imagine buying these in a package.  The package won't contain all the memories of fall pumpkin carvings from my childhood, nor will it bring my friends together for our annual carving contest.  I am willing to have them but once a year to ensure that they travel directly from pumpkin to pan.  

Make them again?  Same time, same place next year.

Improvements?  I wouldn't change a thing.... 

Wednesday, October 27, 2010

Bacon & Cabbage Salad


This salad happened on a day when I didn't know what to do with some fall cabbage I'd received.  I've read that bacon takes the edge off of some bitter greens - such as cabbage or brussel sprouts, so I decided I'd give it a shot.  I cooked the bacon first, then placed it on paper towels to crisp up.  I drained off 99% of the grease and left one little smidgen to saute the cabbage in.  I wilted the cabbage along with a white onion for about 15 minutes.  The recipes that I consulted to inspire this dish suggested the cabbage be cooked for an hour - but that was far too close to sauerkraut for me.  After just a quarter of an hour the cabbage still retained a little crunch.  I added a splash of white wine and reduced it for about five more minutes.  Out of the pan and onto a plate, the cabbage/onion blend received it a seasoning of s&p and its shower of bacon crumbles.  

Make it again?  Maybe, but it definitely needs some variation.  I realized after we munched on this afternoon salad that I am actually not a huge fan of cooked cabbage.  

Improvements?  Yes, to the cabbage.  I think just shredding it and dressing it will do the job.  Leaving the cabbage raw and only sauteing the onions might be the way to go.  The bacon could also be whisked into the dressing and warmed for a perfect finishing touch. 

Saturday, October 23, 2010

Just for Fun....Infused Chocolate Tasting


I love samples at the grocery store.  One of my favorite things about heading to purchase my groceries is wondering what will be on display for a little taste.  These tiny chocolate bars caught my eye as I wandered the aisles of Whole Foods before my family dinner tonight.  So for dessert tonight, I decided I would bring the concept of sampling to the dinner table.  Each bar had distinct flavorings: an Asian flair from wasabi, ginger and black sesame seeds; an Indian style with curry and coconut flakes; Mexican ancho chiles, chipotle and cinnamon in the third; and well, bacon with salt (does that qualify as American?).  In our tasting we discovered delicious chocolate at the forefront with the infusions coming through in the aftertaste, lingering in our mouths. On a hunch we saved the bacon bar for last and we were justly rewarded.  It was salty, smoky, and oh so savory.  A perfect ending to our meal.

Do it again?  Oh yes, it was tons of fun to be surprised by these creative flavor pairings.  I'm going to search for more infused chocolate bars for next time I'm out....

Improvements? Perhaps having an after dinner wine to compliment the chocolates. 

Kale Chips


Kale is a vegetable that is new to me in the kitchen.  I hadn't ever handled it before it started arriving in my box this fall.  At this point, we are at odds.  I am not sure of my feeling for kale.  It is incredibly dense and tough.  And the taste is so unique, it's not quite like any other green.  In the few times I have consumed kale, the word 'grazing' comes to mind.  Anyways, tonight I made kale chips.  Kale chips have been popping up literally EVERYWHERE I turn.  So after seeing them in countless magazines and cooking shows, I started to think I was in for a real treat.  I spread my washed kale onto baking sheets in a single layer, massaged each leaf with olive oil, sprinklde s&p and got them into the oven.  After a quick twenty minutes at 375 degrees they were ready.  What came out? Well, a crisp leaf to be exact.  The noise made as I crunched into my first kale chip was...... well......loud.  Crispy, but still a little chewy and tough.  Then I looked in the mirror.  Super sexy teeth.  I'm not even sure if I digested any or if it all just stuck in my teeth.  Definitely not a romantic, date night food.  And yet, they were strangely addicting.  Despite all the cons listed above, I found myself reaching for another.  And another.

Make them again?  Like I said, I'm not quite sure.  Kale is in season right now so I am pretty sure it will arrive on my doorstep again soon.  The kale chips were quick and easy to prepare, but I may search for another way to tackle this tough guy.  

Improvements? Using less olive oil.  To achieve the 'chip' in kale chips, use the oil sparingly and rub the teeny bit used all over the entire leaf.  Too much oil in one part of the leaf resulted in a soggy chip :(

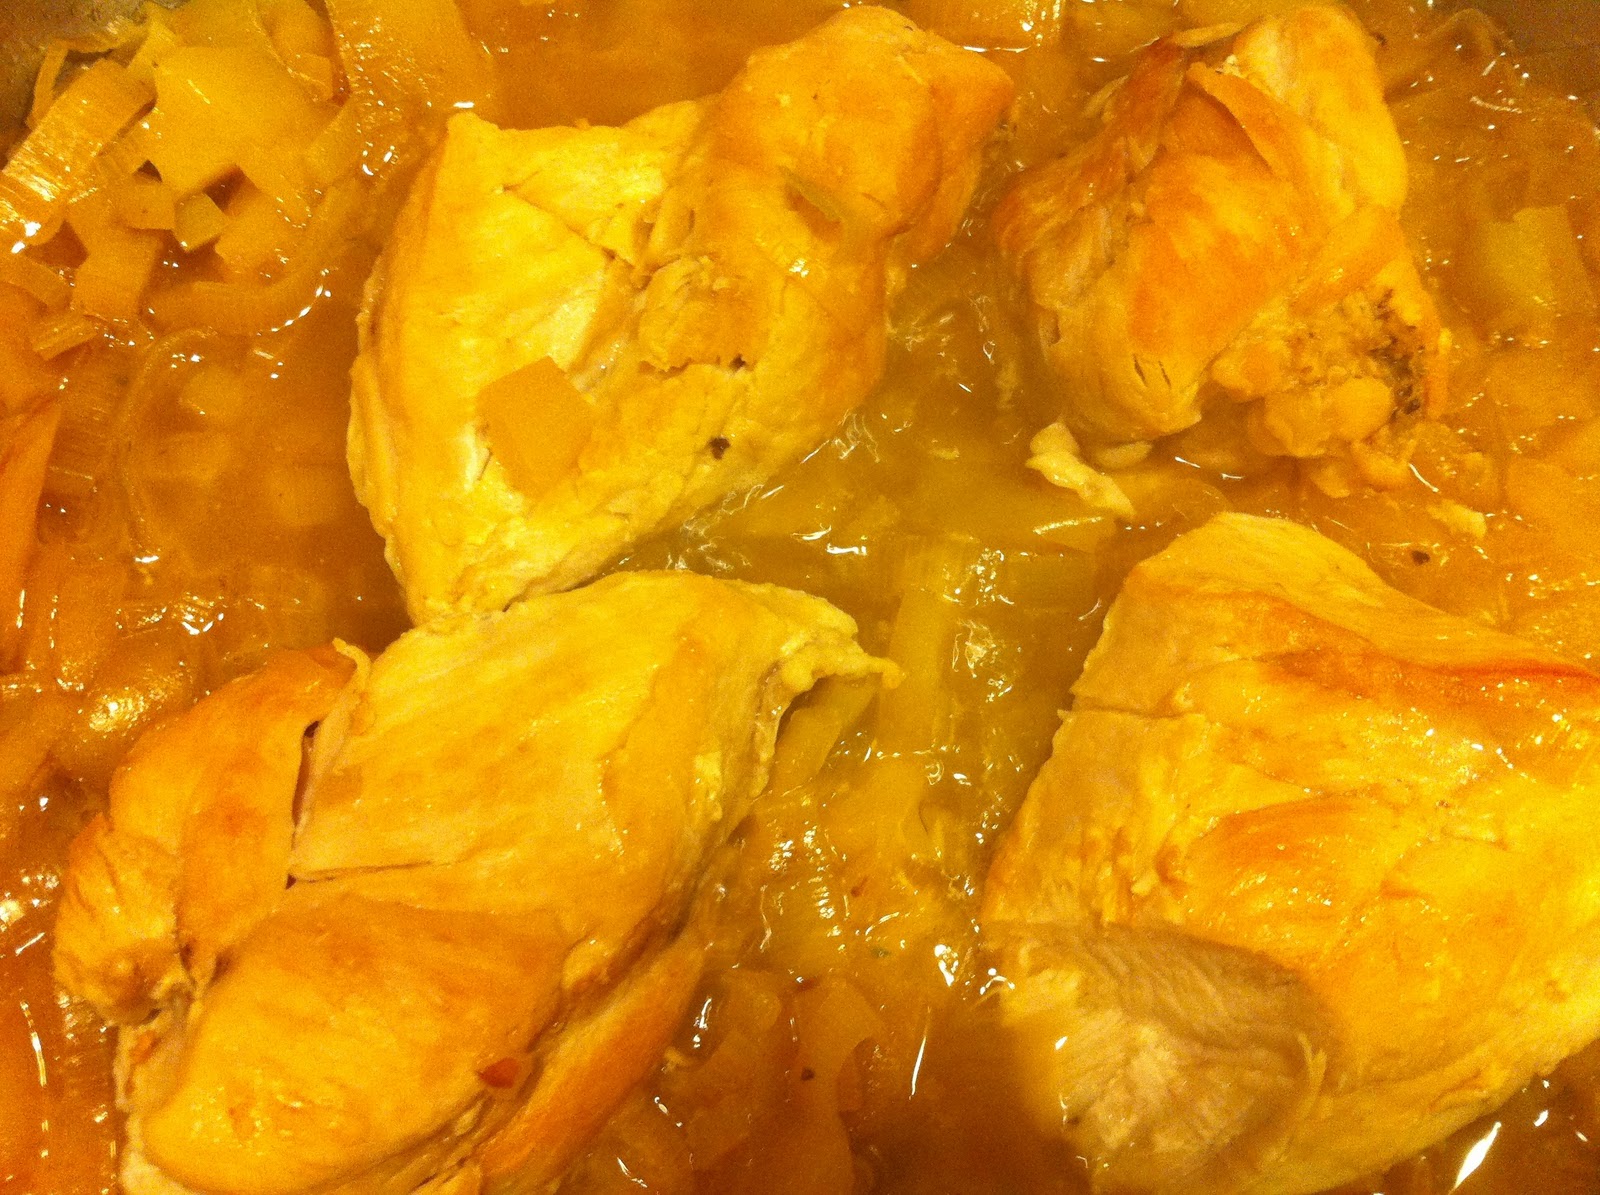
Cider Braised Chicken with Leeks and Apples


This is a grand slam.  I have to call it an instant success, my now-Famous Fall Chicken.  Long have I struggled with chicken: how to find that perfect done-ness in between overcooked, dry and tastless, but not undercooked and deadly.  I am continually possessed by the fear that I may kill my sweet family with raw chicken and tend to overcompensate with many meals of chewy chicken.  

Aside from slow cookers, I was in search of a way to cook chicken in less than 8 hours and still have it come out juicy and tender.  Braising did the trick.  Here's what I did:  the pan was heated to a very high heat initially and I seared the chicken to a golden brown - to the point where there were delicious brown bits forming on the bottom of the pan.  After the searing the chicken pieces were removed to rest on a plate.  Leeks and apples, such a beautiful fall marriage of fruit and vegetable, were tossed into the pan with a bit of good olive oil.  I sauteed them until the leeks began to caramelize, the apples looking like a delicious newcomer in my saute pan.  When I thought they could take no more, I popped the top on a bottle of cider beer and poured a bit in.  From my extensive cooking channel marathons, I believe this is called deglazing the pan.  I am calling it sheer disbelief - all those brown bits (the ones I thought I would be scrubbing out later on) literally floated up off of the pan and into the mix.  I daresay, the pan was spotless.  As the cider reduced, I continued to add more until I had added roughly half of a bottle.  Then it was time for the chickens' return.  I nestled each breast among the leeks and apples as the cider continued to bubble.  Down went the heat and on went a tin foil tent over the pan - it was time to cook the chicken through a slow simmer.  Twenty minutes on the timer, and enough time to enjoy a glass of wine before the main attraction was ready. The result can hardly be described by words alone - the juiciest chicken, the perfect fall compliments from the sweetness of the apples, the subtle spice of the leeks and the tangy cider.  A perfect 10.

Make it again?  Already made it two more times :)  Like I said, it's my Famous Fall Chicken from this point forward. 

Improvements? Incorporate more pieces of chicken, like the thighs.  Experiment with different types of beer. 

Wednesday, October 20, 2010

Roasted Green Beans


The more vegetables I roast, the more I love roasting!  I have always steamed, blanched, or sauteed green beans, but I was curious about how they would turn out after spending some quality time in my oven.  I feel as though I am unlocking the secret behind eating vegetables:  steaming or blanching often results in limp, bitter eats.  No wonder we aren't devouring them.  Roasting makes everything better.  A quick rinse, a toss in olive oil, s&p and into the oven.  These didn't take long either - just about 25 minutes and they were browned and sizzling.  I wouldn't go so far to say this brought out a sweetness in them, but they definitely became more savory.  I sat down with a platter of them and a half hour sitcom, and when 30 minutes had gone by they were gone as well!

Make them again?  Roasting is now my choice method for taking on these haricot vert.

Improvements? Perhaps more seasoning, in additional to s&p.  Or maybe drizzle a melted garlic sauce on them when they come out of the oven.  Although I must say, I am a huge fan of the beautiful simplicity that olive oil, s&p can achieve. 

Monday, October 18, 2010

Baked Potatoes with Sauteed Spinach, Leeks & Sour Cream


This is my prized creation of the week.  Unbelievably delicious!  Here's what happened: I was feeling a little under the weather, a little chilled due to the rain and the admittance that fall is in fact here.  In my box, I found four Russet potatoes and began to get that reminiscent feeling of how comforting a baked potato can be.  But baked potatoes can be dry.  I am determined to banish my kitchen of dry tasting foods.  I peeked into my fridge and remembered that I had purchased my favorite condiment earlier in the week: sour cream.  I knew I couldn't use sour cream alone though; my baked potato would be delicious, but not that nutritious.  So I dug further into my box and came up with this: I would attempt an alternative spinach dip to top my potato.  I started by sauteing leeks, one of my very favorite fall vegetables.  As they began to brown, I washed a giant bunch of spinach and tossed it on top.  Spinach always amazes me - the amount you start with hardly compares to what you end up with.  Nevertheless, I wilted the spinach down, seasoned them both with s&p and brought them off the stove to cool.  When my potatoes finished baking, that is when the magic began.  I cut the steaming potato open and in a bowl I quickly whipped a couple tablespoons of sour cream with two heaping scoops of spinach and leeks.  It resembled spinach dip and I dolloped it straight into the potato.  Absolute heaven.  Creamy, delicious, nutritious and ......comforting. 

Make it again?  Ha ha...I had the remaining potatoes with topping for breakfast and dinner the next day.  Do I still need to say yes?  This goes straight to the top of my fall rotation.  

Improvements?  Possible addition of artichoke hearts into the saute mixture.  Any other leafy green could most likely be substituted for the spinach as well.